Threads, inserts, and nuts
Sooner or later you'll want to screw something to a printed part: close a lid, hold down a plate, mount an enclosure you'll open again. FDM plastic isn't metal: it won't survive a fine thread or repeated tightening without stripping, so the question isn't "which screw do I use?" but "what is the screw biting into?" There are four answers, and getting it right is the difference between a joint that lasts years and one that strips on the third assembly. A single question sorts them from weakest to strongest: how many times will you assemble and disassemble this?
Four ways to anchor a screw
Order them by resistance to repeated use: a thread printed directly into the plastic; self-tapping into a pilot hole; a metal nut captured in a pocket; and a brass heat-set insert melted into the part. They all end in a metric thread, but they last very different numbers of cycles, and they fail in different ways.
| Method | Thread that grips | Assemblies before failure | When |
|---|---|---|---|
| Printed thread | plastic, coarse pitch | a few | lids and caps, M6+, hand-tight |
| Self-tap into a pilot | plastic, cut on entry | few | occasional assembly, no extra hardware |
| Captive nut | metal (standard nut) | many | you want to use standard hardware |
| Heat-set insert | metal (brass) | hundreds | product, repeated assembly and disassembly |
The important jump is in the middle of the table: moving from plastic to metal. As long as the thread lives in the plastic, every tightening cycle scrapes a little material off the flanks; once the thread is metal, the screw never touches the plastic, so tightening no longer wears the thread.
Printed thread: only for coarse pitches and light loads
Modeling the thread straight into the part is the no-hardware option: lid and body screw into each other and that's it. But FDM has a hard resolution limit. A bead is on the order of the nozzle diameter — about 0.4 mm with a standard nozzle — and a small thread asks for flanks finer than the bead itself: a standard M3 has a 0.5 mm pitch, and the printer can't lay down what won't fit in a single bead. Those flanks fill in, round over, and the thread smears into a rounded-over helix that doesn't grip.
That's why a printed thread only works with coarse pitches: M6 and up (1 mm pitch or more), and even then with clearance on the flanks so the male thread enters without seizing against the female thread. Print it with the axis vertical whenever you can: crest and valley come out clean from flat stacked layers, instead of stepped as they would if printed on their side. Even so, the lower flank of each thread is still about a 30° overhang, so with large pitches and poor cooling it can sag a little — it won't come out perfect on its own.
It's good for a lid you close by hand, a cap, a ferrule — joints where the load is gentle and you assemble only a few times. Don't put it where there's real tension, or where you'll tighten and loosen daily: it strips.
If you're going to model the thread yourself, the profile geometry — flank angle, crest and valley clearance, why to orient the axis — is in Modeling threads.
Heat-set insert: the thread that survives repeated assembly
When the joint is assembled and disassembled many times, the heat-set insert gives the most return for the effort. It's a brass bushing with a metric thread inside and a knurled or stepped outside; you melt it into the plastic with the tip of a temperature-controlled soldering iron, typically between 220 and 280 °C depending on the material (PLA at the low end, ABS, PETG, and nylon higher up). The brass heats the plastic around it, softens it, and sinks in; on cooling, the plastic grips the knurl and the insert is anchored. The result is a metal thread that withstands hundreds of cycles of tightening without losing its grip.
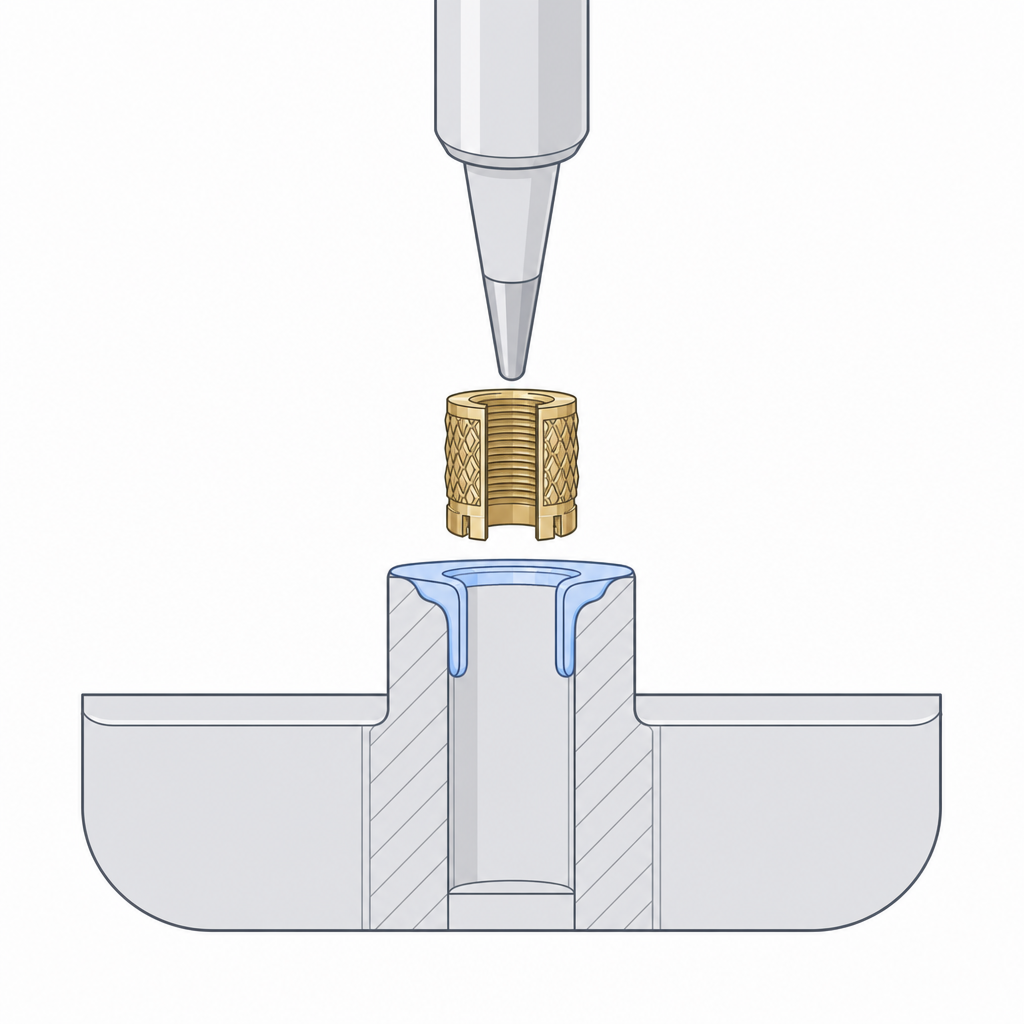
Temperature cuts both ways. Too cold and the plastic won't flow into the knurl: the insert goes in only by force, and crooked. Too hot and you burn the polymer — it degrades, bubbles, and on cooling it doesn't fill the knurl, so the insert ends up loose. Aim for the point where the plastic melts cleanly just around the brass.
The other key is the boss it sits in. The hole is not made to the insert's outside diameter: it's made slightly smaller and lightly tapered — wider at the top to guide entry, narrower at the bottom. That way, as it melts, the brass pushes softened material into the gaps of the knurl instead of sitting loose in a slack hole. A hole that's too wide leaves the insert loose, and it will spin when you tighten the screw; one that's too narrow overflows plastic and the insert goes in crooked.
Watch the boss wall too. If it's too thin, the insert splits it as it expands and, above all, as you tighten the screw: the boss cracks radially and the joint falls apart. This is the most common heat-set failure, ahead of thread stripping. The exact dimensions — boss bore diameter, taper, minimum wall around it — are in Designing for heat-set inserts.
Captive nut: standard hardware, no soldering iron
If you don't want to buy inserts or heat anything, a hex nut captured in a pocket gives you a metal thread at almost no cost. You model a hex cavity sized to the nut, push it in (press-fit or through a side slot), and the screw enters from the other side and threads into it. It's cheap and strong, and it uses standard hardware you'll find at any hardware store.
Three details decide whether it works. First, the hex clearance: too tight and the nut won't go in, or it splits the pocket walls when you force it; too loose and the nut spins in its cavity when you try to tighten, and you never get it to thread. Second, nut retention: in a side pocket, without a lip or a snap-fit to hold it, the nut shifts before the screw finds it; and in a face-up pocket it drops out the moment you flip the part. Third, if the pocket is horizontal — with its roof parallel to the bed — that roof is a bridge the printer spans across the cavity with nothing underneath. A short bridge comes out fine; a long one sags and leaves a rough face or blocks the screw's path. When you can, orient the pocket to insert the nut from the top or through an open side and avoid the bridge. The hex and screw-hole clearances are detailed in Captive nuts and clearance holes.
Self-tapping into a pilot: fast, but only for a few cycles
The simplest option: a smooth pilot hole, a little smaller than the screw, and a screw that cuts its own thread as it goes in, forming the flanks in the plastic it displaces. No nut, no insert, no thread to model. It works, and for an assembly you'll do once or twice it's perfectly valid.
The pilot is around 0.7 to 0.8 times the screw's outer diameter, and where you land in that range depends on the material: toward 0.7–0.75× in tough plastics like PLA, ABS, or PETG, and only toward 0.8× in stiff, brittle materials like a reinforced PC, to ease the hoop stress as the screw expands the hole. If the pilot is too narrow, the screw doesn't displace material but splits it and bursts the boss; too wide and there's no plastic left to bite, so the screw spins without gripping. Leave a generous wall around the pilot, because the screw expands the material as it enters and a thin wall splits under the pressure.
Its limit is reassembly. Each time you back the screw out and drive it in again, it doesn't fall exactly back into the thread it cut: it scrapes off a little more plastic, the thread widens, and after a few cycles it strips and the screw spins without holding. If the part is assembled and disassembled often, use a captive nut or an insert from the start; self-tapping is for joints you tighten and forget.
Engagement length: why a short thread strips
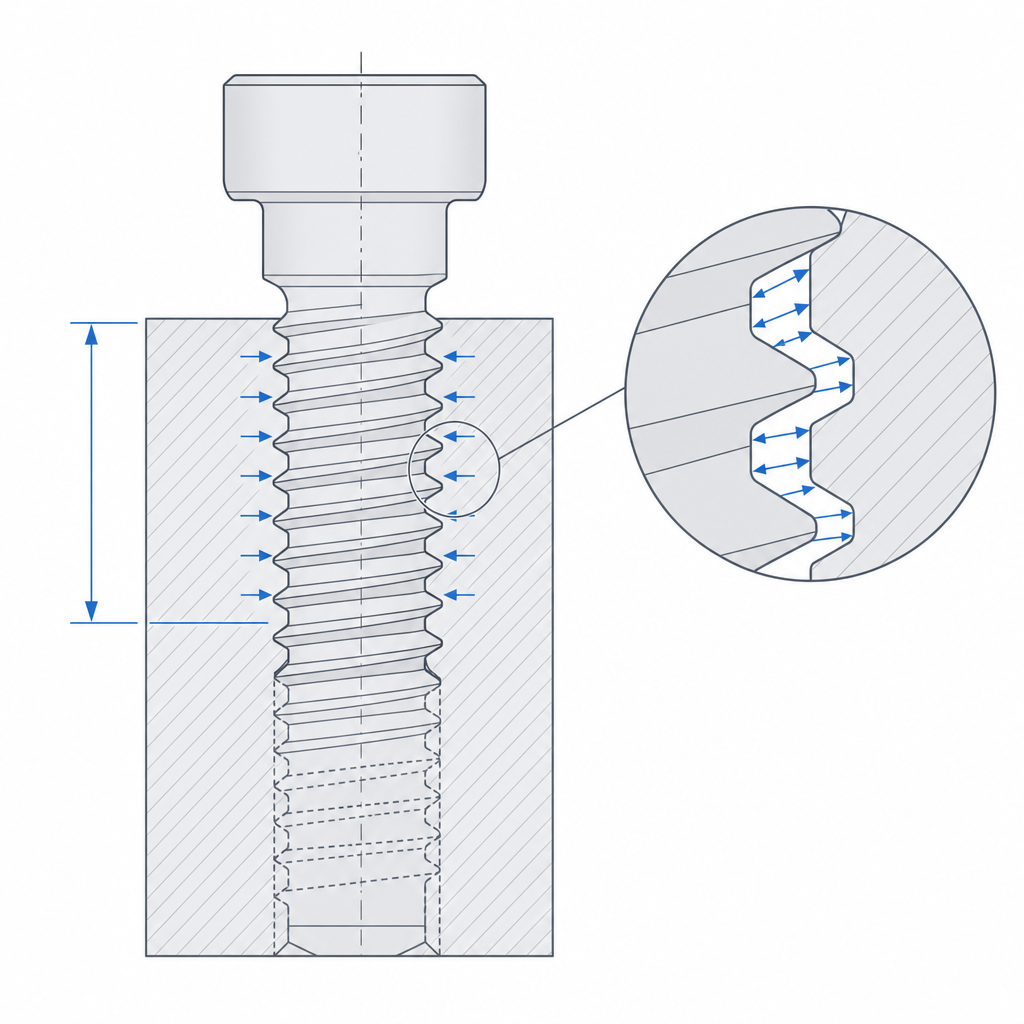
Any of these four methods shares one rule that decides whether the joint holds load: the thread needs engagement length. The screw's force isn't shared evenly along the thread — it concentrates on the first few threads in the engagement. If only one or two threads are engaged, the whole effort lands on them and they tear the material out in one pull.
The rule of thumb for a printed thread or a captive nut is to engage 1.5 to 2 thread diameters of plastic: for an M4, on the order of 6 to 8 mm of useful depth. In metal, one diameter would do; plastic is softer, so you need more length so the load spreads over more threads and none is overloaded. Self-tapping asks for at least the same, leaning toward two diameters. The heat-set insert is the exception: its engagement length is set by the bushing itself, which already comes with its metal thread — you only size the boss so the whole insert fits with solid wall around it. In all of them, too short a grip strips, no matter how well you get everything else right.
Once you've chosen the route, the next step is to size it. If you're modeling the thread, see Modeling threads; if you're going with metal, Designing for heat-set inserts and Captive nuts and clearance holes give you the exact dimensions your printer can reproduce.