Reversible snap-fit: the click that assembles and releases
You don't want most of the snap-fits you design to be permanent. You want to open the lid to swap the battery, pull the board out to repair it, separate the module to store it. You need a joint that goes in with a firm click and comes back out by hand, again and again, without losing its grip along the way. That is the reversible cantilever snap-fit with a release ramp, and it's the default choice when you want tool-free assembly. It's the same cantilever arm as the permanent snap, with one difference that fits inside a single angle: the return face is a ramp, not a wall. And whether the click lasts a hundred assemblies or breaks on the third comes down to that angle, the length of the arm, and a couple of tenths of clearance.
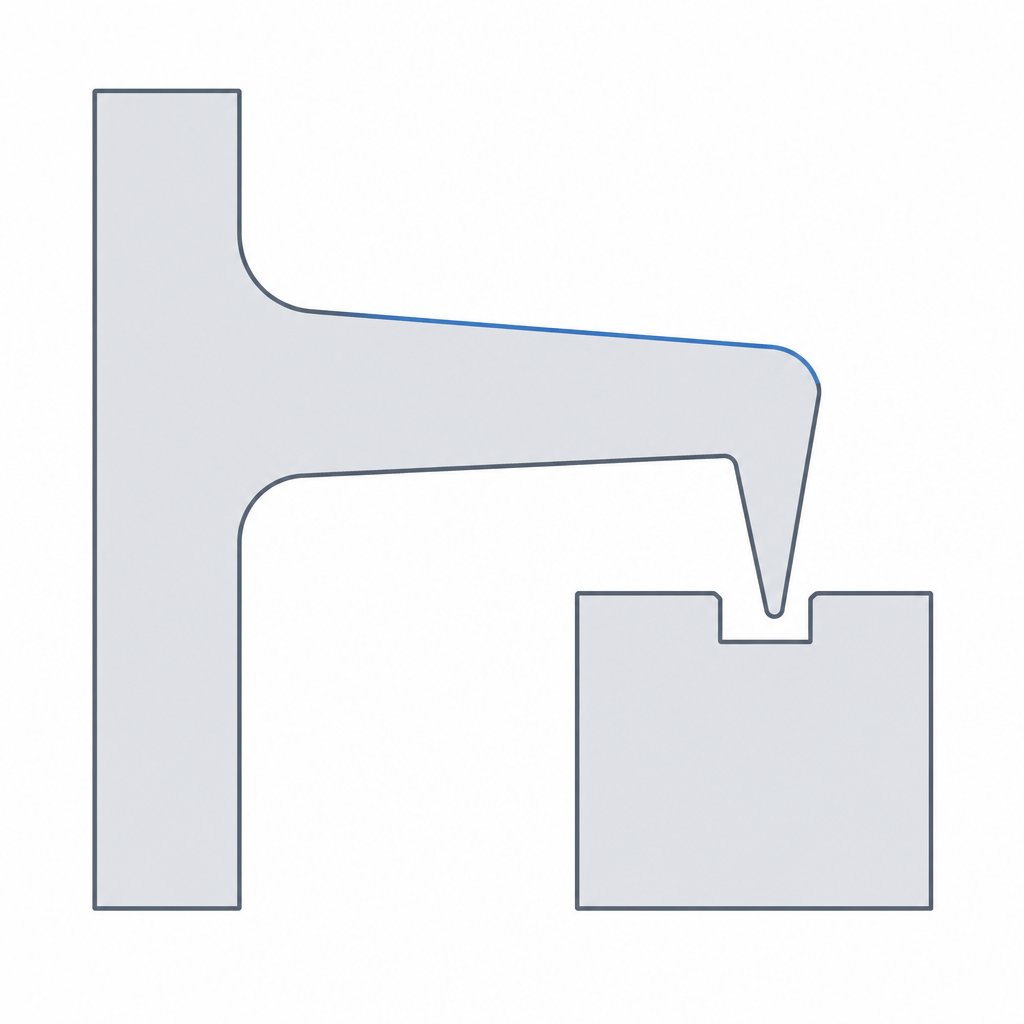
The hook that holds and the hook that lets go are the same arm
A cantilever is a beam with a tooth at its tip. All its mechanics are those of the beam: as you assemble, the front ramp of the tooth strikes the edge of the catch window, and the axial push you apply resolves into a component that bends the arm. The arm flexes, the tooth clears the shoulder, and once past it the arm springs back and the tooth drops into the window. Up to here, every snap-fit does the same thing.
What separates the reversible from the permanent is the retention face, the rear face of the tooth, the one that meets the edge when you try to pull the parts apart. It pays to fix a convention and stick to it: we measure the angle of each face relative to the pull-out direction, so that 0° is a ramp lying flat and 90° is a perpendicular wall. If the retention face is a shallow counter-ramp — on the order of 30° to 45° — then pulling behaves just like the entry ramp: it resolves your axial force into a component that flexes the arm again. The tooth retracts on its own, rides up its own exit ramp, and the joint opens. The kinematics are symmetric on purpose: what goes in over one wedge comes out over the other.
With that convention in hand, the rule is simple: the shallower the counter-ramp, the easier it releases; the closer you take it to perpendicular, the more it retains, until around 80°–90° it stops releasing and becomes permanent. A reversible lives in the shallow zone, which is why its retention face is considerably less steep than that of a permanent snap. At 45° you get the classic balance: because the exit wedge is symmetric to the entry wedge, the force that opens the joint is on the same order as the one that assembled it. That is what you want from a reversible — not that it resist any load, but that it resist loads smaller than the assembly push while yielding cleanly when you push on purpose in the pull-out direction. That boundary between releasable and permanent is developed in Snap-fits that won't release; here we stay on the side that does open.
| Face | Angle from pull-out | What it controls |
|---|---|---|
| Entry (front ramp) | 25°–35° | Assembly force: shallow = gentle click |
| Retention (counter-ramp) | 40°–50° | Pull-out force: at 45°, releases by hand, not by accident |
| Tooth overhang | 0.4–0.8× the arm thickness | How far the arm must flex to assemble |
The root decides whether it lasts a hundred clicks or three
The mistake that breaks the most cantilevers is intuitive and wrong: making the arm short and thick on the assumption that this makes it more robust. It's exactly the reverse, and the physics of the cantilever beam explains it without ambiguity. For a given tip travel — which is exactly the tooth overhang, how far the arm has to move aside for the tooth to pass — the maximum strain appears in the outer fiber of the root, where the arm meets the part. And that strain grows linearly with the arm's thickness and falls with the square of its length.
That asymmetry is the whole design strategy. Doubling the arm length divides the strain by four; halving the thickness only divides it by two. Lengthening pays twice what thinning does. So when a tab won't hold, the problem is almost never that it's "too weak": it's that it's too short for the overhang you're asking it to clear. The right lever is to lengthen the arm and, if you can, lower the tooth height, because both pull the strain peak downward and move it away from the material's limit. In a reversible this matters twice as much as in a permanent: the arm doesn't flex once in its life, it flexes on every assembly and every disassembly, so each cycle takes the root back to its maximum strain. Working near the material's limit on every click is buying failure on the installment plan.
And it pays to put a number on that limit, because without one, "leave margin" is just words. The figure that governs the design isn't the stress, it's the material's maximum allowable strain: how far the outer fiber can stretch without cracking. Brittle PLA gives little margin — on the order of a 2–4% design peak, well below its elongation at break — while the more ductile PETG, ABS, or PP tolerate considerably more before failing, which is why they take shorter arms or larger overhangs at the same safety. Size the arm so each click's strain stays comfortably below that figure rather than grazing it.
Print it lying down, not on edge
All the mechanics above would hold for any manufacturing process. FDM adds a trap of its own: the part is anisotropic, strong along the beads and weak between layers, where only the weld of one layer to the next holds it together. And a cantilever is dominated by bending at its root, exactly the place where that weakness does the most harm.
If you print the arm on edge — with the layers stacked in the direction the arm bends — every flex pulls directly on the bond between layers. The outer fiber of the root, where the stress is greatest, then coincides with the weakest plane in the whole part. The result isn't that the arm breaks by bending the material: it delaminates, splitting open between two layers like a clean crack, often on the first click. The rule, stated without ambiguity: the layer lines must run parallel to the arm's axis and perpendicular to the plane it flexes in, so that no layer interface is put under the tension of the bending. In the common case, where the arm bends perpendicular to the bed, that means laying it flat on the bed whenever the assembly geometry allows. Why this anisotropy exists and how to orient each moving part is developed in Layer orientation for motion.
Sometimes the assembly forces the bending direction perpendicular to the bed, and there's no way to lay the arm flat. When that happens, reinforce the layer adhesion right at the root: raise the extrusion temperature a few degrees, drop the speed in that zone, and consider a slightly wider or taller bead to thicken the weld between layers. It won't match a flat-lying arm, but it delays the failure: from delaminating on the third assembly to doing it on the thirtieth.
Clearance: the gentle click comes down to a few tenths
The tooth has to enter its catch window without rubbing sideways, and here FDM pushes against you again. A window modeled at nominal dimensions comes out narrower than you drew: the extrusion width thickens the walls inward, and elephant's foot closes up the first layers. It pays to separate two clearances that aren't the same thing. The side clearance, between the flanks of the tooth and the sides of the window, is anti-rub and can be generous: if it's missing, the tooth jams in, scrapes the flanks on every assembly, and the friction raises your insertion force and abrades the tooth — in the worst case, it seizes. The clearance at the retention face, on the other hand, should be minimal or none: that's where the tooth bears to hold, and every tenth you leave there is retention you lose.
For the side clearance, leave on the order of 0.2 to 0.4 mm per side according to what your calibration tells you; for the retention face, as tight as your calibration allows without the fit seizing on assembly. That range isn't a catalog number: it comes from measuring your own machine, because the material, the nozzle, the speed, and the flow can easily shift it by several tenths. The honest way to fix it is the same as for any other printed fit, and you have it in Tolerances for moving parts: you print the coupon, test what gap goes in cleanly without play, and keep that number. Overshooting the other way isn't free either — too much clearance and the tooth rattles in its window and loses effective retention — but between the click that seizes sideways and the one that rattles, side rub is the one that punishes the root.
What it's for and why it breaks
A 45° reversible cantilever is the natural choice for what you open with some frequency but want to stay firm in between: lids, housings that separate for repair, modules that come out and go back in. It is not a sealed closure, and not a joint for hot service. If you need sealing, this isn't your fit. And watch the material even if the part doesn't get hot: PLA flows slowly under sustained load (creep) even at room temperature, so a tooth that lives pre-stressed in its window can relax over the months and lose retention right where you wanted it firm — and if it's also going to heat up, remember that near the Tg this accelerates sharply. Design it so that at rest, assembled, the tooth isn't pre-stressed: let it bear on its retention face without forcing the arm.
It pays to name the three failure modes, because each has its antidote and you've already met all three across this article. The first is fracture by delamination at the root, and it's cured with orientation: arm lying flat, layer lines along the flexing axis. The second is loss of retention by creep, after many cycles or with time under load, and it's cured by not pre-stressing the hook at rest and choosing the material for its creep behavior, not just its thermal service. The third — over the few tens or hundreds of assemblies a reversible lives through — isn't classic high-cycle fatigue but fracture from exceeding the allowable strain in a single click, aggravated by the relaxation between cycles: it's cured with margin, lengthening the arm until each click's strain stays comfortably below the material's limit. All three reduce to the same principle: in a snap that assembles and disassembles many times, the luxury isn't retention force, it's margin. Design with room to spare against the strain limit, and the click will last as long as it has to.
If the answer to "should it be able to open?" is no — if this should never come apart — then this isn't the fit: take the retention face close to 90° and strip off its exit ramp, as Snap-fits that won't release explains. Everything else — the rounded root, the flat-lying arm, the measured clearance — is identical. The entire boundary between the joint that opens again and the one that closes forever fits, as you've seen, inside a single angle.