Push-push latching button with a heart cam
This is the mechanism inside a retractable pen: press once and the button stays in; press again and it pops out. A single input — pushing — and two alternating responses, with nothing on the outside to tell you which state you're in. That bistability doesn't come from a spring with two seats or from a ratchet: it comes from a closed, heart-shaped track around which a pin travels one full lap for every pair of presses. Understanding the button means understanding that path, why it has to run in a single direction, and why, of every mechanism in this catalog, it's probably the most unforgiving to print in FDM.
One input, two states
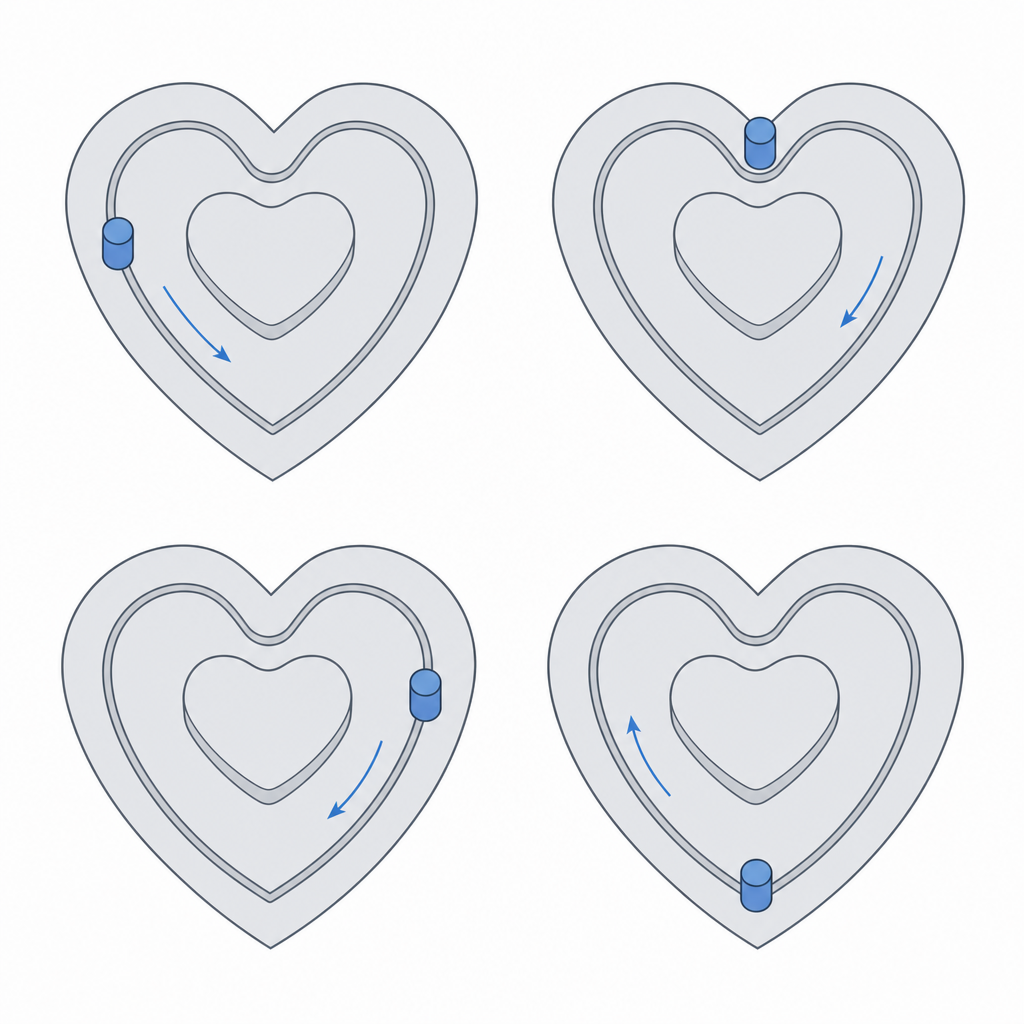
Watch the floor of the groove, not the button. You have a follower pin — a small rod — forced to travel around a closed track (the groove) cut into one part, while a spring pushes the assembly outward and keeps it pressed against the floor of that track at all times. The button only moves along the axial direction: you supply the inward stroke, the spring supplies the return, and the geometry of the track turns that straight-line back-and-forth into the travel of the contact point along the heart's contour. Nothing rotates: neither the part nor the pin spins about its axis; what "travels around" is the contact point where the follower meets the track.
The cycle has four steps, and the key is overtravel: each action requires pressing past the resting position. Starting from rest (button out, follower in the outer branch), you press all the way down: the follower runs down one of the track's slopes to the deepest point, which sits below the latching notch. You release: the spring pulls outward, but the angled wall won't let the pin come straight back; it deflects the pin sideways and drags it until the pin drops into the notch at the apex of the heart — the re-entrant feature the cam is named for — at mid-stroke, above the point of maximum press. There it's trapped — the latched state, button in — and it stays put because the spring holds it pinned against the flank of the notch. You press again, once more all the way down: the follower leaves the notch from below, toward the deep point. You release: the spring returns it, this time along the opposite branch, all the way to rest. Button out again. One full lap for every two presses, and in between, two stable positions that the same gesture alternates between.
Read this way, it's clear there's no intelligence anywhere: there's a track, a follower, and a constant preload. All the logic lives in the shape of the groove.
Without a one-way path, the cam doesn't latch
Here's the subtlety almost everyone misses when modeling it. If the track were a plain heart-shaped groove at a uniform depth, the follower would have no reason to prefer one branch over the other: on release it could just as easily come back the way it just descended, never reach the notch, and the button would behave like an ordinary pushbutton that bounces without latching. The heart only works if the path is one-directional, if the follower is physically forced to always travel in the same sense.
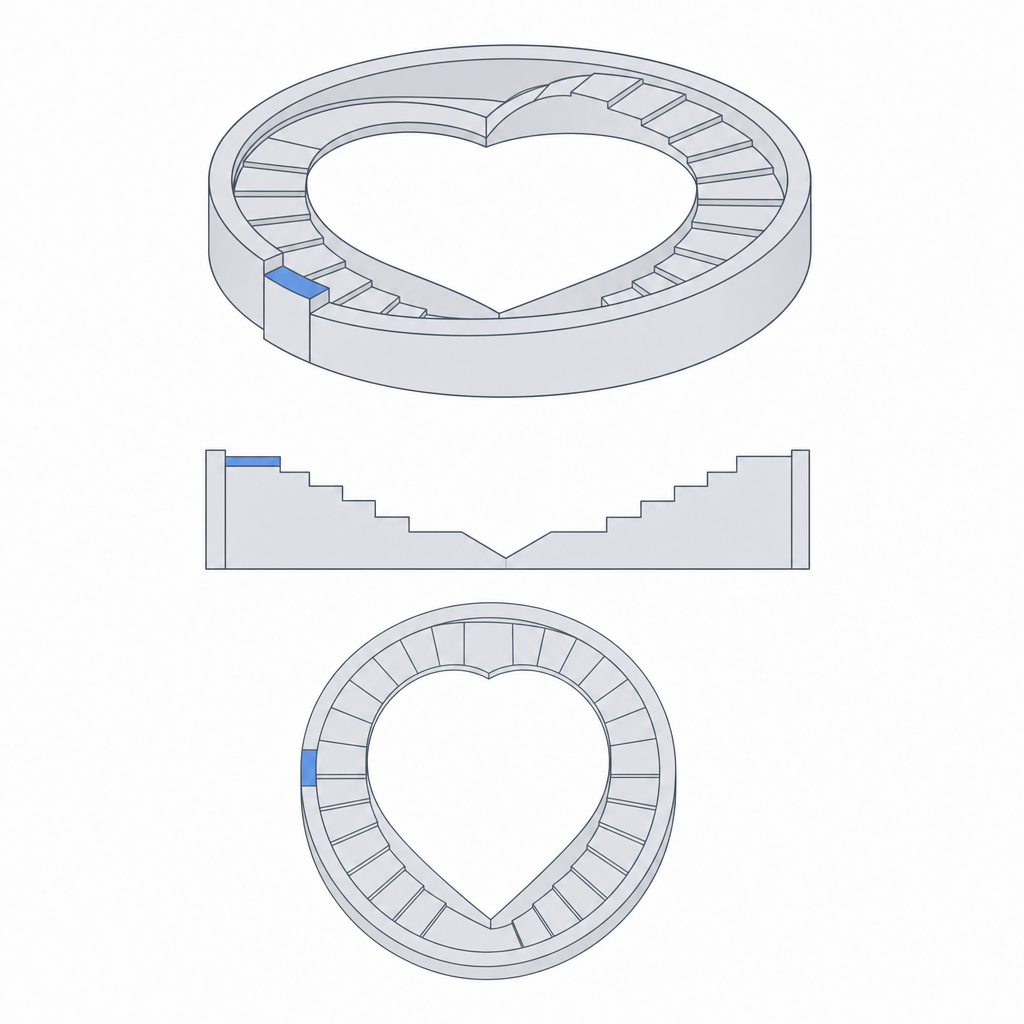
That's achieved with relief on the floor of the groove: a succession of small ramps and steps that turn the track's floor into a circular staircase. The follower drops a step, and on reaching the bottom of that stretch it meets a vertical wall — a Z-step — that keeps it from backing up; the only way out is forward, toward the next, lower stretch. Each step is a one-way valve: it lets the follower pass in the direction of the cycle and blocks the opposite. For this to work, the follower has to stay pressed against the stepped floor at all times; that doesn't come from the return spring, which pushes along the axis, but from the lateral elasticity of the pin itself — a rod that flexes sideways and stays hugged against the relief — or a secondary tab that presses it against the plane of the track. Remove the steps, or let the follower float above them, and you're left with a reversible track that doesn't retain reliably: sometimes it latches, sometimes it doesn't, with no way to predict which.
That's why the critical detail of this mechanism isn't the heart silhouette seen head-on, which is the easy part, but the height profile of the track's floor. That's where the real kinematics live, and that's where FDM is going to have the hardest time.
Why the heart cam is the hardest button to print in FDM
The heart track concentrates, all at once, nearly everything a layer-by-layer process does badly. The Z-steps that give it one-way travel have to be tall enough that the follower can't ride over them: below half a millimeter they fall within the printing noise — one or two layers, indistinguishable from roughness — and stop blocking the backward motion. You want retention steps that are several full layers tall, on the order of 0.5 to 1.5 mm, not "a few tenths." The fine detail of the silhouette — the tight radii at the apex and the lobes — competes with the bead width: with a 0.4 mm nozzle the bead runs 0.4–0.5 mm and rounds off any corner you wanted crisp; holding that detail means dropping to a smaller nozzle. And the groove, seen in section, can have internal overhangs: walls that fly over the gap and, without support, sag and close off the opening the follower needs to pass through. All of this happens in a small part, where every absolute error counts for a lot in proportion.
The practical upshot is that this is the geometry that most punishes the "I'll draw it nominal and it'll just slide" approach. Here it doesn't slide: the groove comes out narrower and the steps coarser than modeled, and the follower seizes up or jumps the track. You have to design it with generous clearances and, above all, with orientation in mind from the start. The usual move is to split the part in two: a body and a cap that carries the track, so the groove ends up as an open channel on a flat face — no overhangs, no roof to support — instead of a blind tunnel impossible to clean. With the cap-channel lying on the bed, the relief of the track's floor builds upward, layer on layer: done this way, the retention step is defined by the Z-stack, and that's where you want the blocking face to come out as vertical as possible. Splitting the clearance between those two halves follows the same reasoning as any other printed fit; we cover that in Tolerances for moving parts, and how to decide orientation relative to the layers, in Layer orientation for motion.
The return spring holds the logic together
All the kinematics described take one thing for granted: that the follower is always in contact with the track. The instant it loses that contact, the one-way logic evaporates — the follower floats, skips a step, and the in/out cycle breaks down. What guarantees the return stroke and keeps the system under preload is the return spring, and that's why it isn't a secondary component you can size by eye: without that preload the mechanism doesn't exist.
It has to be a real spring, with enough force across the whole stroke: a metal coil spring housed in the body is the robust, predictable choice, and it fits the logic of dropping standard hardware into a printed part that you'll find in Embedded hardware: magnets, bearings, and inserts. A printed flexure might tempt you, but it's under permanent preload — compressed the whole time — and there every FDM thermoplastic relaxes: PLA is among the worst for creep, and while polycarbonate or nylon hold up somewhat better, none keep the preload indefinitely. For a permanent return, use a metal spring and leave it at that. A weak spring, or one that's gone slack, fails in the most confusing way possible — the button sometimes latches and sometimes doesn't — because it leaves the follower to decide by inertia which step it falls into, which is exactly what the track was designed to prevent.
| Symptom | Physical cause | Where to act |
|---|---|---|
| Presses but doesn't latch | Z-steps too low or rounded: the follower rides over them | Increase the step height (several layers); orient the blocking face vertical |
| Latches sometimes and not others | Weak or relaxed spring, or a floating follower | Metal spring with ample preload; lateral elasticity in the pin |
| Seizes mid-cycle | Pin-to-groove clearance too tight | Open up the groove clearance over the measured value |
| Skips a step in-plane | Lateral clearance too loose | Tighten the clearance; increase the step height |
| Derails out of the track's plane | Track too shallow: the follower slips out | Deepen the track |
| Stops retaining with use | Wear: the step rounds off from cycling | Metal pin or a smooth face; lubricate the contact surfaces |
The follower: free, but not loose
That leaves the fit between the follower pin and the groove, and it's a textbook case of why clearance isn't "the more the better." The follower has to travel free through the whole track — it must not seize anywhere, not even in the tight radii at the apex — but not loose: with too much play, the moment the path asks it to switch branches the pin has room to slip over a step instead of dropping into it, and it derails. Too tight and it gets stuck mid-cycle; too loose and it stops respecting the one-way travel that's so hard to print. The good window is narrow, on the order of a fine sliding fit, and as with any printed part you have to budget it against the measured groove, not the nominal one, because the track comes out tighter than drawn.
And don't neglect the contact over the medium term. The mechanism cycles by the follower sliding on the ramps, and in plastic-on-plastic the layer roughness and friction are high: the retention step rounds off with use and one day stops blocking — the same "presses but doesn't latch" symptom, but from wear, not from printing. A metal pin or a smooth contact face, plus a little lubricant, greatly extend the service life.
That narrow margin, on top of the Z-steps and the internal overhangs, is why the push-push button remains an emblematic mechanism, easier to admire than to print reliably: it gathers all of FDM's weaknesses into one tiny part at once. If you take it on, do it in pieces — body and cap, open groove, tall steps oriented face-on, metal spring — and calibrate the follower's clearance the way you'd calibrate any other moving joint. The method for finding that number, rather than inheriting it from a table, is the same one in Tolerances for moving parts.