Ratchet and pawl: one tooth per stroke, no backdrive
A ratchet is a mechanism that only knows how to say yes in one direction. You push the pawl and the wheel advances one tooth; you release and the wheel can't retreat a fraction of a degree. That directional stubbornness — advance in steps, never retreat — is what drives a car jack, a cable-tie tensioner, a socket wrench, or any winding mechanism. And the whole mechanism rests on a single geometric decision: the asymmetry of the tooth. Get that shape and the pawl's preload right and you'll have clean advance with a firm click; get them wrong and you'll have a wheel that slips backward or a pawl that rounds off on the third stroke.
The asymmetric tooth is the whole mechanism
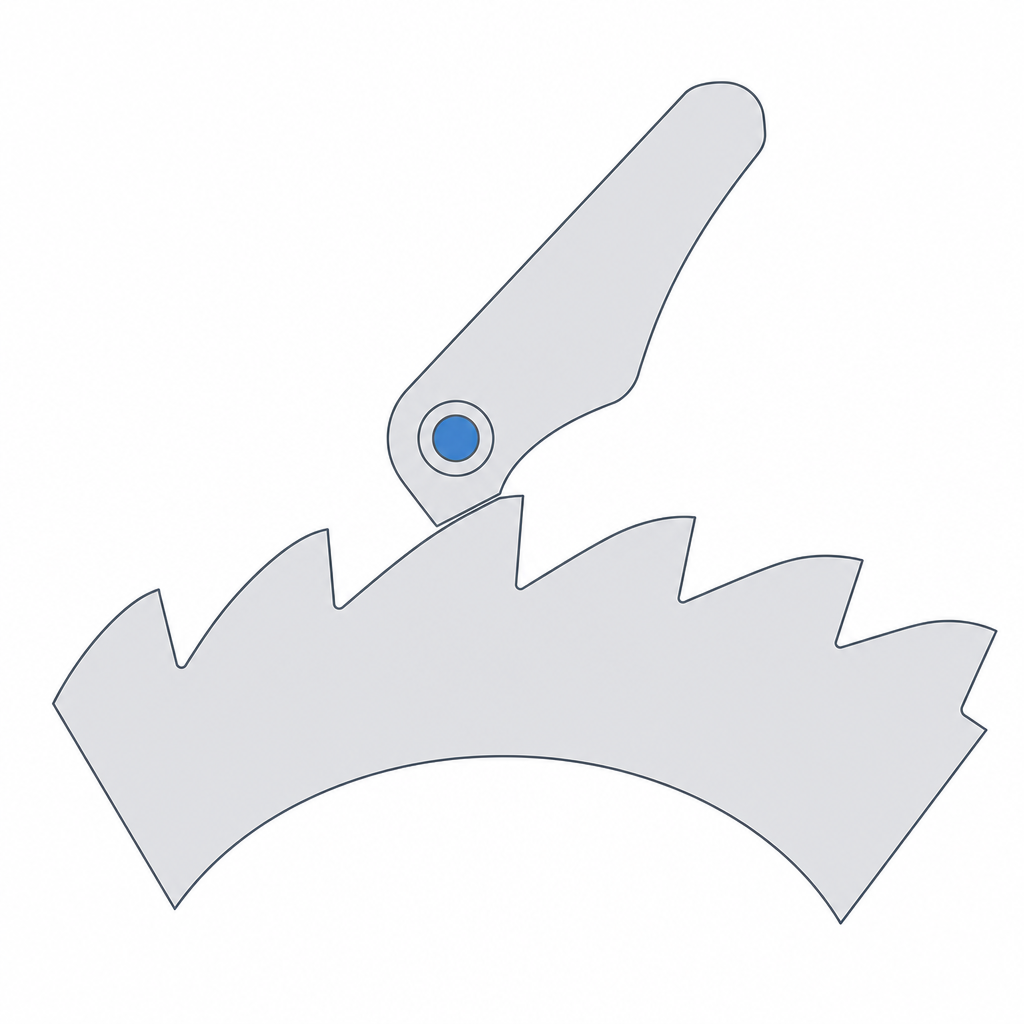
Look at a ratchet tooth in profile and you'll see it isn't symmetric like a gear tooth: it has two flanks doing opposite jobs. One is a gentle ramp, laid back; the other is an abrupt face, nearly radial with respect to the wheel's center. That asymmetry isn't decorative — it's the entire kinematics.
When the wheel turns in the advance direction, the pawl's tip rides up the gentle ramp of each tooth, slips over the top, and drops into the next gap. The ramp turns the rotation into a small lift of the pawl, which it clears effortlessly: advance is free. When something tries to turn the wheel backward, the pawl meets the other face: the abrupt one. Here there is no ramp for the pawl to slide off. The pawl butts flat against the locking flank, and now the force, instead of lifting the pawl, presses it into its seat. The wheel stays pinned.
The physical key is which way the locking face points. If that face were angled like a ramp, the backdrive force would resolve into a component that lifts the pawl: exactly the wedge you wanted to avoid, the same logic that separates a releasable snap from a permanent one. That's why the locking flank is brought as close as possible to the radial line — a pressure angle near zero or slightly negative relative to the radial — so the contact line passes through the pawl's pivot or sits behind it, with no lever arm to deflect it. Designed this way, pulling backward only tightens the contact: the joint self-locks. The limit is no longer whether the pawl releases — it won't — but what the tooth can take; in FDM that limit is the flank's resistance to shear, covered at the end.
Advance comes in steps, not sweeps
A ratchet doesn't give continuous motion; it gives steps. In its minimal configuration, every time you work the lever the driving pawl drags the wheel exactly one tooth's worth of angle and stops; on the lever's return, the driving pawl slides back over the teeth's ramps — without moving the wheel, because the holding pawl restrains it — and gets ready for the next stroke. That's the cycle: push, index, retract empty, repeat. Advancing one tooth per stroke isn't fixed by the mechanism. A real wrench indexes as many teeth as fit within the lever's swing arc, so the pitch per stroke is something you set with the lever angle against the tooth's angular pitch.
From this comes the central design tradeoff, and it's worth being clear on it before you draw anything. The number of teeth sets the resolution of the advance. Many small teeth give you fine steps, an almost continuous advance, and precise angular control. Few large teeth give you coarse steps but robust teeth. And you can't have both: at a fixed wheel diameter, every tooth you add thins all the others. In FDM this matters twice over, because a printed tooth already has less useful cross-section than you drew and a locking flank that works in shear. If you need fine steps, raise the tooth count knowing you sacrifice the torque each one can take; if you need the mechanism to carry load, stick with few teeth and long steps.
The same number governs the feel. The characteristic click isn't decoration: it's the sound of the pawl jumping the edge of each tooth and striking the bottom of the next gap. More teeth: more clicks per revolution and finer retention. Fewer teeth: clicks that are more widely spaced and more emphatic. The resolution of the advance and the resolution of the click are the same number.
The flexure pawl: the spring you don't buy
A pawl needs something to keep it pressed against the teeth at all times. If it loses contact, it stops holding and the wheel backs up. In a metal mechanism a separate spring does that. In FDM you have a much better option, and it's where the process truly shines: fusing the pawl and its spring into a single part, making the pawl itself a cantilever arm that flexes. The cantilever is the spring. There's no spring to buy, to assemble, or to lose.
This turns the pawl into a cantilever-beam problem, with all the physics that entails. As in a snap, the geometry dictates how far the tip lifts on each jump, so what matters isn't the force but the deflection travel. For a given travel, the maximum strain lives in the outer fiber at the root, where the arm joins the body, and the stress at that root grows linearly with the arm's thickness and falls with the square of its length. The practical consequence is the same as in any printed tab: lengthening the arm helps far more than thinning it does. A short, stubby pawl looks more robust but is exactly the opposite: it works near its limit on every jump and relaxes or snaps at the root. Give the arm length and round its root with a fillet radius of at least half the thickness (r ≈ 0.5·t); below that the stress-concentration factor spikes and the pawl tears apart at the root before the rest of the arm is even stressed.
Preload: the adjustment that fails at both extremes
The force with which the pawl presses against the teeth is the most delicate adjustment in the mechanism, because it fails at both extremes. With too little preload, the pawl doesn't seat at the bottom of the tooth: it rests partway up the flank, skips teeth instead of catching them, or disengages on its own with the first vibration. The wheel backs up. With too much preload, it presses so hard against the ramp that advancing takes noticeable effort: friction rises on every stroke, the flanks wear sooner, and the click turns into a scrape.
The middle ground is found through geometry, not by tightening the spring. The pawl should drop all the way to the bottom of the gap between teeth — that's where it rests, that's where it holds — and the tooth's ramp should be gentle enough for the pawl to climb it without binding during advance: a ramp angle on the order of 20° to 40° relative to the tangent keeps the lift gradual. A ramp that's too steep forces the pawl to lift abruptly on every step, which feels like a hard, jerky advance; a laid-back ramp spreads that lift across the rotation and leaves the advance fluid. Design the contact at the bottom of the tooth first, then tune the ramp so the lift is gentle; the preload comes from the arm's geometry, not from forcing it.
And remember that the pivot hole — both the wheel's and the driving pawl's — is a printed fit like any other: it needs its sliding clearance to turn freely, calculated on the measured diameter and not the nominal one, because the printed hole comes out narrow and the shaft comes out thick. If you leave it at zero, the wheel binds instead of turning and the pawl's preload no longer governs the feel. The method for setting that gap is in Tolerances for moving parts.
Print it so the locking flank works with the layers
Here's the trap unique to FDM: the part is anisotropic, strong along the beads and weak between layers, where only the adhesion of one layer to the next holds it. The locking flank of each tooth is where all the holding torque concentrates, and it works in shear. If you orient it wrong, it isn't the bead that breaks: the part delaminates between two layers, the tooth flakes off, and the wheel starts slipping backward.
The rule is to print the wheel flat-faced on the bed, the teeth in the XY plane. That way each tooth is a solid profile whose locking flank meets the backdrive force with the bead's continuous cross-section, not the weak bond between layers. Printing the wheel on edge, with the layers stacked in the direction the pawl pushes, aligns the weak plane right with the most loaded flank: it's the recipe for the teeth to shear off. The same goes for the flexure pawl, which should flex in the plane of the layers so that each jump follows the beads instead of peeling them apart; the full reasoning behind this orientation is in Layer orientation for motion.
Printing the part already assembled (print-in-place) is perfectly viable — the wheel, the pawl, and the shaft come off the bed already functional — but only if you take care of two things at once: the shaft's clearance, so the wheel turns without fusing to its support, and the pawl's preload. And here's the detail most often confused: the pawl is modeled in its relaxed position, barely grazing the tooth, not pre-flexed from the factory. The preload arises from the minimal geometric assembly — the tip dropping into the gap — not from printing the arm already deformed against the tooth; an arm printed in interference is exactly the one the box above tells you to avoid, because it ends up preloaded at rest and creeps.
A printed ratchet has three failure modes, all predictable. First, teeth that round off or break at the locking flank under torque: fewer, thicker teeth and the correct orientation prevent it. Second, the flexure pawl loses preload through fatigue or material creep and stops engaging: a long arm, a rounded root, and little preload at rest delay it. Third, backdrive because the holding pawl disengages: almost always a locking flank that's too angled, generating the wedge you were told to avoid, or insufficient preload. If your ratchet backs up, start by looking at the abrupt flank's angle before anything else.
The pawl is, after all, a snap that engages and releases many times instead of just once; the same rules of hook geometry, rounded root, and orientation that govern a permanent latch apply to every jump here. If you're going to design the pawl in depth, Snap-fits that won't release gives you the cantilever-beam mechanics we've only touched on here.