Chainmail and scale armor: rigid-flexible fabric
You print one rigid plate, set another next to it linked with some slack, and repeat the motif a few hundred times. What comes off the bed isn't a plate or a pile of loose plates: it's fabric. A sheet that folds and drapes over your hand like a piece of leather, but that, if you pull it from both ends, stretches a little—taking up the slack you built in—and then locks up hard and gives no more. You haven't printed an object, you've printed a material that didn't exist before: an articulated metasurface with two incompatible properties in a single solid piece—free bending and stiffness in tension. And the whole trick lives in a few tenths of a millimeter of air between one plate and the next.
Why it gives when you bend it and locks when you stretch it
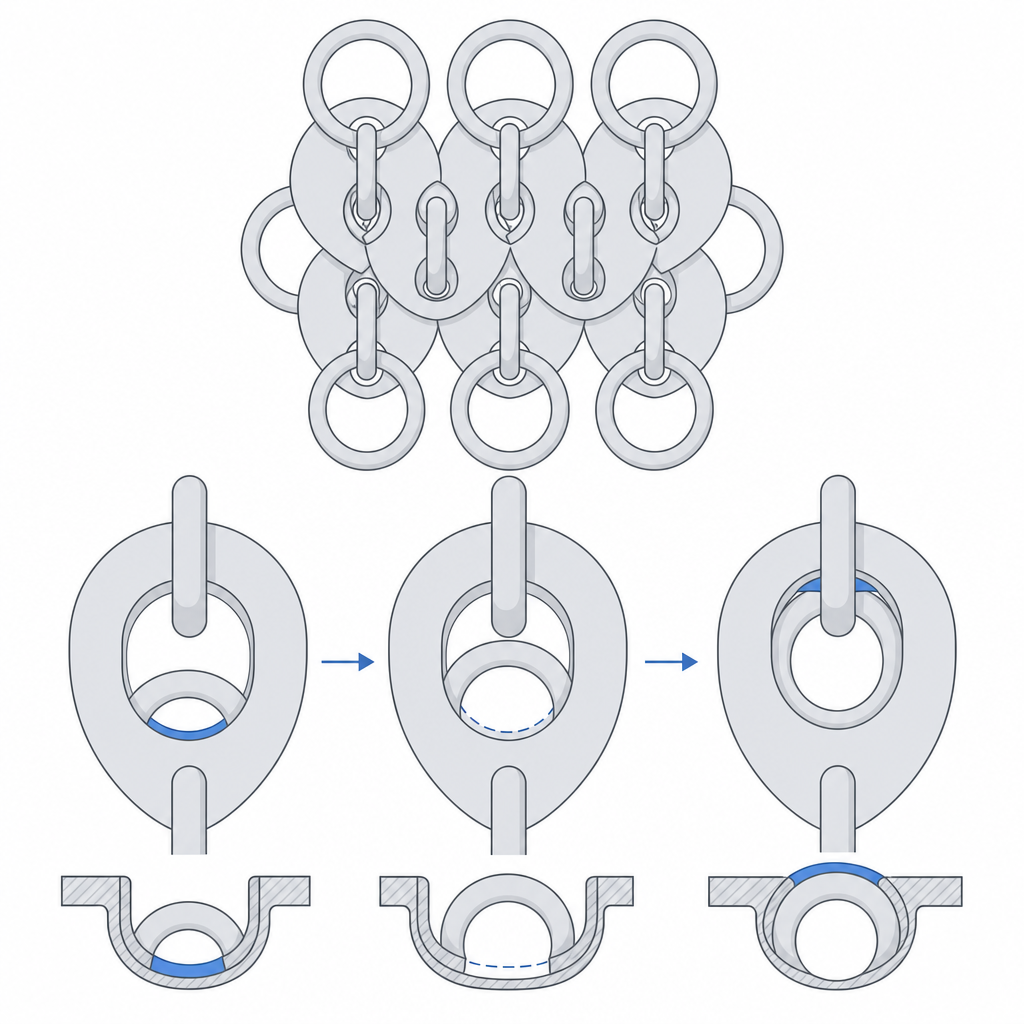
Printed chainmail has no hinges and no axles: it has links that overlap with play. Each plate is tied to its neighbors through a ring or a tab that passes through the window of the one beside it, and a gap remains between the two surfaces that touch. That gap is what gives both behaviors at once, depending on which direction you load it.
When you bend the sheet, each plate rotates a little relative to its neighbor around the link. Because there's slack, that rotation is almost free: the plates fan open and the whole thing curves without the material doing much work. You aren't flexing plastic: you're spending slack you built in on purpose. That's why a well-calibrated mesh drapes at a small radius and folds under its own weight, just as a textile drapes because each thread has little bending stiffness and the warp-and-weft crossings slide over one another without resisting.
When you pull on the ends, the opposite happens. The plates can't separate indefinitely because the link prevents it, and what provides the stop depends on the pattern. In a mesh of interlinked rings, the ring bears against the wall of the window it passes through: that's the tension stop. In a pattern of overlapping scales, it's the overlap of one plate riding over the next that hits and arrests the stretch. In both cases there's first a short take-up phase: the sheet stretches softly until the slack is used up, and only then does the stop come under load. As soon as the slack runs out, the assembly stops giving and starts working in tension, and there it's no longer the air that responds but the solid plastic of each link. The sheet goes stiff all at once. This is the kinematics of real fabric: the steel mesh of a medieval hauberk or the scales of a fish bend with no effort and resist stretching by the same mechanism: links that rotate freely until they overlap and catch. You don't set the tensile stiffness with thickness: you set it with the stop, and that stop lives in the geometry of the link.
The link gap is unforgiving
This prints as a single piece, with every link already in place and tied, no post-assembly. The mesh lives by the same principle as a print-in-place chain: between every pair of surfaces that have to move relative to each other there's a gap of air that the slicer must respect, and that the printer must not fill or weld. That gap is the parameter that decides whether what comes off is fabric or a block.
The margin is narrow on both sides. If the slack is too small, the perimeter swallows the gap and two adjacent plates end up touching and welding somewhere. (Remember that the real bead is wider than nominal and widens the wall on both sides, and that over-extrusion and the elephant's foot of the first layers make it worse.) It only takes a few links fusing for that zone to stop articulating: stiff patches appear in the middle of the fabric, and sometimes the whole sheet comes out rigid because the chain of welded links runs across the entire piece. If the slack is too large, there's so much slack that the links unhook: the mesh comes apart on its own or stays floppy and without the stop that gave it tensile stiffness.
There are two gaps to calibrate, not one. The lateral gap (in the plane of the bed) is set by the bead width; the vertical gap matters whenever the link crosses in Z—a ring passing over another—and there the floor is the layer height: you need at least one layer of air between the two surfaces, better two, or they weld in Z even if the lateral one is perfect. Don't guess at either one. The effective clearance between two printed walls isn't what you draw, because the process widens the perimeters and closes the gap. The criterion for setting it per side—not by diameter—and the coupon that tells you your real gap with your machine and your material are in Tolerances for moving parts. Print that coupon before you launch a sheet of a thousand links: each link welds or stays free locally and independently, so the chance that at least one comes out fused grows with the number of links. A thousand-link sheet is far less tolerant than a single loose pivot, and a gap error that would be marginal in one link can leave seized patches scattered across the whole sheet.
The three levers of the fabric: thickness, overlap, and pattern
With the link articulating, you have three levers to decide what kind of fabric you want, and each one pulls on a different property.
The plate thickness governs the stiffness of each link and, with it, how protective the surface is. Thin plates weigh little, bend at small radii, and give a soft fabric that conforms; thick plates barely deform themselves and give a stiffer, more protective surface, at the cost of a coarser drape and a larger bend radius. The overlap—how much each plate rides over its neighbor—sets two things at once: how much angular travel there is before the stop (and therefore the drape angle, how far a plate can rotate before it hits) and, in scale patterns, the tensile stiffness (how hard the stop bites when it arrives). A lot of overlap with a thin plate is a soft fabric that arrests early in the stretch; little overlap lets it rotate more but catches later.
The link pattern decides whether the sheet is isotropic or directional, and that axis is independent of the size of the links. Isotropy is set by topology, not density: a mesh of interlinked rings, where each ring stitches its neighbors in several directions, drapes similarly in every direction; a pattern of rectangular plates overlapped like fish scales or roof tiles drapes beautifully in the direction the scales open and resists much more in the perpendicular one, where the overlap won't let them rotate. Making the links smaller and more numerous covers more area and refines the grain, but a scale pattern stays anisotropic no matter how dense you make it. There's no single best pattern: there's the one that puts the flexibility where your piece has to bend and the stiffness where it has to hold.
| If you raise… | The fabric becomes… | At the cost of… |
|---|---|---|
| Plate thickness (starts at 1–2 mm) | Stiffer, more protective | Coarser drape, larger bend radius |
| Overlap between plates (≈25–40% of plate width) | Harder in tension, arrests sooner | Less free angular travel |
| Lateral clearance (≈0.3–0.5 mm) | Looser, drapes more freely | Risk of coming apart and losing the stop |
| Vertical gap in Z (≥1–2 layer heights) | Articulates in Z without welding | Taller link, more material |
| Pattern density (smaller links) | More coverage, finer grain | More links, more weld-failure points |
Treat these as starting points, not recipes: the real gap depends on your machine, and that's why the coupon overrules the table.
Print it flat, no supports between plates
This whole family prints lying flat on the bed, in a single run, with the plane of the fabric parallel to the build plate. It's not a preference, it's what makes print-in-place possible. With the plates flat, each link stacks its layers horizontally, and it's worth distinguishing two kinds of gap: between plates that only coexist in the plane, the gap is lateral and the nozzle works around it without bridging; but wherever links actually pass through each other—any link that genuinely interlocks—there's a vertical gap that does get bridged, and that's exactly the one that causes sagging trouble. It's also the orientation that aligns the beads with how the mesh is loaded, the same layer-orientation reasoning that governs any moving part and that Layer orientation for motion develops: the layers in the plane of the fabric, not on edge.
The hard rule is no supports between plates. A support in the link gap fills it with material, and peeling it off—if you can peel it off at all—leaves the link welded or splintered; either way, not articulating. Design the geometry to hold itself up: the overlaps and rings have to be bridgeable, with short overhangs the bead can cross without falling. Where one plate rides over another there's a small bridge, and it's best for it to be short and for the first layer that forms it to find support on both sides; an overlap that's too open bridges poorly, sags the bead, and closes the gap you wanted to keep.
And then there's the bed. A sheet of chainmail is, by definition, a large flat surface, exactly the geometry most prone to warping. If a corner lifts as it cools, you don't just deform the outline: you pull on the links in that area and open or close the link gaps, ruining the clearance calibration you worked so hard to set. A plate that peels off mid-print can weld links as it reseats or, worse, make the nozzle drag the piece. Clean bed, a well-seated first layer, a generous brim at the corners or a raft if the material warps, and Z-hop or combing enabled so the nozzle hops over loose links instead of catching them on travel moves. Bed adhesion here isn't a finishing detail: it's what keeps the gap between plates constant across the entire sheet.
Four failure modes—and when the effort pays off
Almost everything that goes wrong in a printed chainmail falls into one of four modes, and you can diagnose all four by eye.
The first is plates welded by a short gap or by over-extrusion: stiff patches appear that won't bend, or a whole sheet seizes up. The cause is insufficient gap—lateral or vertical—or too much flow; you fix it by opening the link clearance and calibrating the flow, not by blindly dropping the temperature. The second is the inverse, fabric that comes apart: the links unhook because the joint sat too loose, and the mesh falls to pieces or loses the stop that gave it tensile stiffness. Here you close the gap or increase the overlap so the link bears against its stop again. The first two are two sides of the same dimension, and that's why the mesh is so sensitive to slack: the range between "welded" and "fallen apart" is a few tenths, and you travel the whole of it across a single large piece.
The third is warping, which lifts corners, deforms the outline and, along the way, throws off the link gap in the zones that move; you address it through bed adhesion and thermal management, not through the geometry of the link. The fourth is poor bridging in the overlap zones: if the overlap's overhang is long, the bead sags, closes the gap below, and welds the link or leaves a dirty finish that rubs and seizes; you fix it by shortening the overhang or reorienting the overlap so it bridges short.
When is all this care worth it? When you need a surface that is flexible and resistant to stretching at the same time, something no solid sheet gives you. Guards that have to conform to the body or to a curved part without giving up their protection; flexible cases and covers; tablecloths, costume pieces, and props that have to drape and fold like real fabric; any surface that has to bend freely and still not stretch when you pull on it. For all of that, the rigid-flexible fabric printed in one piece is what delivers it. And its quality is decided, once again, in the slack. Before the big sheet, go back to Tolerances for moving parts with your measured number.