Star wheel: the indexer cousin of the Geneva
You want something to advance in discrete steps—click, stop, click, stop—rather than continuously: a metering wheel that drops one part per turn, a counter, a feeder that advances one slot at a time. The star wheel does exactly that, and it does it with fewer demands than its famous cousin, the Geneva mechanism. Where the Geneva captures a pin inside a radial slot with fine tolerances, the star wheel is content to push against the flank of a lobe. That difference, which looks like a detail, is precisely what makes it the indexer best suited to surviving an FDM printer: it forgives play, it forgives imperfect tips, and it doesn't force you to fine-tune a tangent entry to within tenths of a degree.
Kinematics: one push per cycle, one step per push
The heart of the mechanism is a driver that rotates continuously and carries a pin or a roller at its periphery. Once per turn, that roller comes into contact with the flank between two tips of the star, pushes it, and rotates it one step. The step is geometric and exact: 360 degrees divided by the number of lobes. A six-lobe star advances 60 degrees per cycle; an eight-lobe star advances 45. During the rest of the driver's turn, the roller is clear of the star and the star doesn't move. Hence the intermittent motion: bursts of rotation separated by rest.
Here is the fundamental difference from the Geneva, and it's worth understanding before you draw anything. The Geneva drives a pin into a captured radial slot: the slot encloses the pin between its two walls. During engagement the slot controls the wheel—accelerating it on entry and braking it on exit along a tangent curve—while between steps the locking is done not by the pin but by a convex crescent on the driver, which seats into the concave relief cut between the slots of the cross and immobilizes it. Don't conflate the two functions: the slot guides during the step, the crescent locks at rest. The star wheel does neither. The roller only pushes a flank, in a single direction. There's no return wall to retain it, no slot to guide it, and no crescent to lock it. This cuts both ways. The good side is that without capture there's no need to fit a pin into a slot with controlled play, which is why it tolerates FDM's play and prints without fuss. The bad side is that the push, on its own, does not lock the wheel between steps: the moment the roller leaves, nothing keeps the star from wandering under inertia or the drag of whatever it carries. That gap is yours to close.
The flank decides whether the push rotates the star or jams it
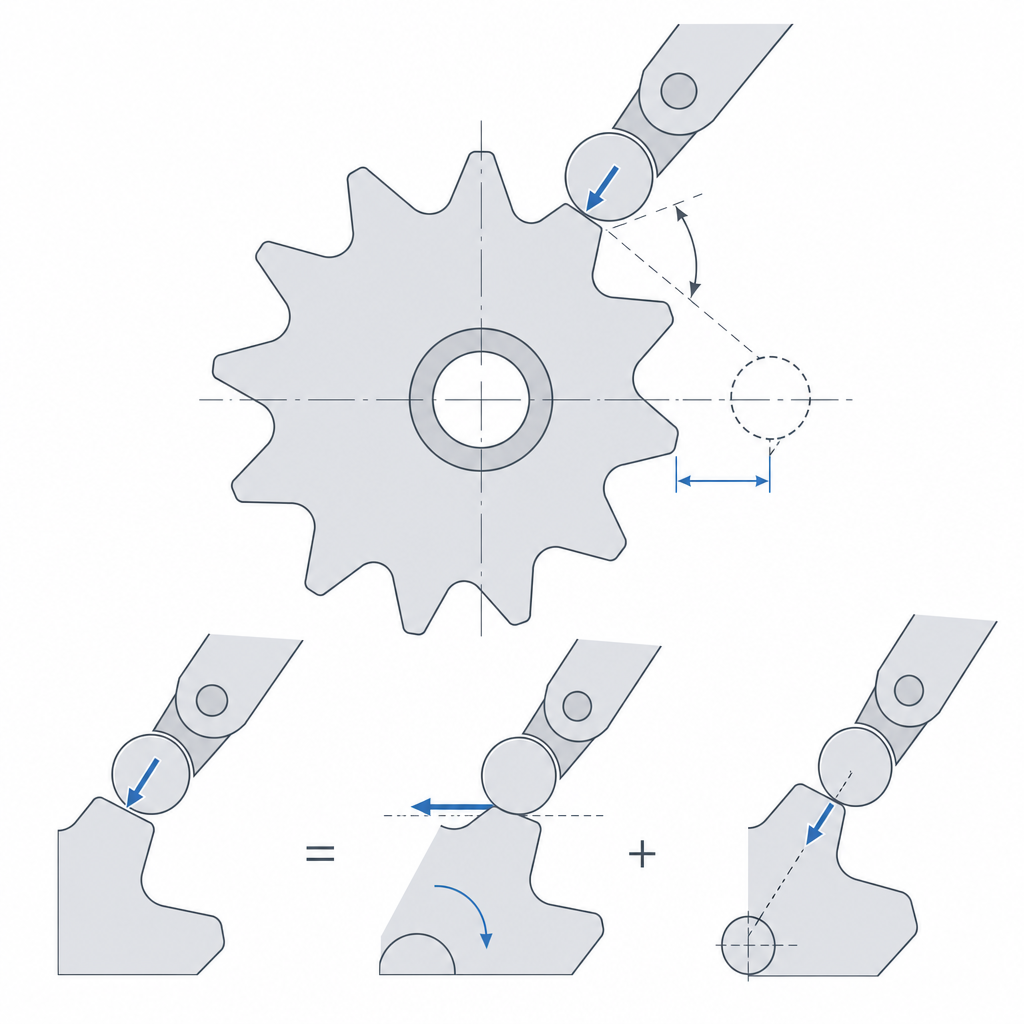
Before thinking about the detent, it's worth looking at the geometry of the flank the roller pushes, because that's where it's decided whether the mechanism actually turns. The roller's push resolves into two components: a tangential one, which rotates the star, and a radial one, which presses it against its axle without moving it. The ratio between the two is set by the angle of the flank relative to the radius of the star. A flank that's too radial—nearly perpendicular to the line of push—generates very little tangential component, and almost all the load goes against the axle: the roller pushes, but the star doesn't start, or it starts at the cost of loading the axle bearing and jamming. The flank has to be tilted enough that the push turns into rotation rather than wasted pressure on the axle.
There's a second geometric problem at the opposite end of the contact: the roller's exit. After pushing, the roller has to leave the engagement zone without hitting the next lobe tip, which by then has already rotated toward it. On fine-pitch stars—many lobes, small angular spacing—the exit clearance tightens and may force you to relieve the flank so the roller clears the tip without pushing it again. Draw the full cycle, not just the instant of the push: the critical moment is usually the exit, not the entry.
The detent is the mechanism, not an accessory
Because the driver's push doesn't retain the star between steps, the detent stops being an optional extra and becomes the part that makes the mechanism actually work. Its job is to seat the star in each lobe the moment the roller releases it, fix the position with a click, and hold the index until the next push. Without it, the star wheel doesn't index: it turns and drifts.
Physically there are two ways to build it. The classic approach is spring plus ball: a ball pushed by a spring drops into a notch in the star at each position, and the ramp of the notch turns any attempt to rotate into a force that returns it to its seat. The other, far more natural for FDM, is a flexure pawl: an elastic tongue printed in one piece, with a rounded tip that seats between lobes. The pawl is a cantilever, and everything you know about how a cantilever beam behaves applies here: the deformation concentrates at its root, so it's governed by the same physics as any snap tongue—covered in Snap-fits that won't release. You want it to flex just enough to let the lobe tip pass and then straighten firmly into the notch, with a fillet at the root so it doesn't delaminate or break from fatigue.
The detent also imposes two competing demands against the driver. On the one hand, it has to be firm enough not to creep between steps, but soft enough that the roller's push overcomes it without jamming the wheel: too hard and the driver forces against the detent on every step, punishing the lobe tips; too soft and the star drifts. On the other hand, there's a second failure mode that's easy to forget: if the driver accelerates the star hard and releases it with angular velocity, the detent has to dissipate that kinetic energy, not just return the wheel to its seat. A pawl that's too soft lets the star bounce and overshoot the lobe—it goes one index too far instead of falling short. The balance that separates an indexer that clicks cleanly from one that ends up half a step short, or a step too far, is a detent with exactly the right firmness.
Print it flat: integrate the detent into the part
Orientation decides almost everything, and here the choice is clear: print the star flat, with the lobes in the XY plane. That way each lobe is a profile lying on the bed, the beads run the full length of the flank, and the roller's push works along the beads, not between layers. A star printed on edge would put the weak interlayer bond right where the roller strikes, and the tips would chip away layer by layer; the reason for that anisotropy and how to orient against it is in Layer orientation for motion.
Flat still leaves a weak axis to watch: the dimension in Z. If the star is thin and the roller contacts at mid-height of the lobe, the push generates an out-of-plane tipping moment that pulls on the interlayer bond. Give the lobe enough Z thickness that the roller can push without flexing the star or peeling layers from that moment. It doesn't invalidate the flat orientation—that's still the right one—it just asks you not to leave the wheel too thin in height.
Printing flat has a second advantage to exploit at no added cost: you can integrate the flexure pawl into the part itself and in the same plane, with no extra hardware. The tongue comes out lying on the bed, flexes in the plane of the layers—which is how a cantilever should flex so it doesn't peel apart—and saves you the spring and ball entirely.
One geometric detail makes the difference between rolling and digging in: round the lobe tips. A sharp tip is an edge the roller can catch on edge as it enters, producing a hard knock and a wear point; a rounded tip gives it a smooth entry surface that the roller slides—or rolls—along toward the flank without digging in. That radius also gives material to the tip, which is the most exposed zone and the first to round off on its own with use. Better that you give it a clean radius than let wear carve it for you.
Why a roller and not a fixed pin
The pushing element can be a simple pin driven into the driver, and it will work. But a fixed pin slides against the lobe flank as it pushes it: there's a relative velocity between the surface of the pin and that of the flank, and that relative velocity under load is pure friction, which in plastic against plastic means wear. Each cycle files the flank a little, the contact rounds off, the step loses firmness, and the advance turns uneven.
A roller—a pin mounted free on a bushing, or a small bearing housed in the driver—trades sliding for rolling. Instead of dragging its surface against the flank, it turns on it, so that at the contact point there's barely any relative velocity and the parasitic friction drops. This comes with a condition worth not hiding: the benefit only exists if the roller turns on its own pivot with less friction than it would have sliding against the flank. A dry printed bushing has a non-negligible pivot friction torque; if that torque exceeds what rolling would need to overcome, the roller slips and goes back to sliding on the flank—exactly the failure you wanted to avoid. That's why a housed bearing, which pivots almost without friction, is the option that actually guarantees rolling. Be clear about what the roller reduces: not the useful indexing force—that's set by the star's inertia and the detent—but the friction component of the roller-flank contact. The driver delivers slightly less force because it stops dragging, not because indexing costs less.
Be honest about the part count. A real roller doesn't come for free: a pin with a printed bushing is already two parts more than the driver body, plus its own axle; a bearing is a bought-in part. The minimal star wheel for FDM isn't "two parts and an axle" if you want real rolling; it's the star with its integrated detent, the driver, and the roller-axle assembly you mount on top. A fixed pin made integral with the driver does give the minimum count, but at the cost of reintroducing sliding. Make the choice knowing what it costs.
| Option | Contact with the flank | Consequence |
|---|---|---|
| Fixed pin | Sliding, with relative velocity | Rubs and wears the flank; more driver friction |
| Roller on a bushing | Rolling if the pivot turns free; if not, it slips | Less wear, no bought-in hardware; adds pin + bushing + axle |
| Housed bearing | Rolling, pivot almost frictionless | The least wear and guaranteed rolling, in exchange for one bought-in part |
The three failure modes and where to look for them
A star wheel almost always fails by one of three modes, and all three are headed off at the design stage.
The first is drift or overshoot between steps, and it's the failure mode specific to this mechanism, the one the Geneva doesn't have: if the detent is weak, the star doesn't stay where the roller left it. It falls short—coasting under inertia, under the drag of whatever it carries, or from a vibration, and the index is lost halfway—or it overshoots, bouncing onto the next lobe when the driver releases it with too much speed. In both cases the metering wheel stops where it shouldn't, or the counter skips a count. The cure is a detent with exactly the right firmness: a pawl with enough stiffness and a ramped notch that returns the star to its seat and absorbs its inertia, without going so far that the driver can't overcome it.
The second is wear of the lobe tips. The whole of the roller's push enters through the tip and the flank right next to it, which is the zone of least section and the most punished. If you printed on edge, that's where it delaminates; if the tip is sharp, that's where the pin digs in and chips it; if the driver is a sliding pin instead of a roller, that's where it files away cycle by cycle. The decisions from the previous sections—print flat with thickness to spare, round the tip, use a roller that really rolls—attack precisely this failure mode. They aren't loose refinements: they're the defenses of the point that breaks first.
The third is uneven advance from excessive play, in the axle or the detent. Too much play in the axle lets the star nod; a detent with too much clearance doesn't seat in the same place every time. The symptom is that the step, which should be geometrically exact—the exact 360°/n step—comes out different on each cycle, and an indexer that doesn't repeat its position is useless for whatever you built it into. Here the clearance isn't a safety margin: it's direct error on the index, so tighten it to the exact slip fit, not a thousandth looser.
If your application doesn't forgive that index error—you need every stop to land exactly where it should, with rigid locking and tangent entry—that's the sign you've left the star wheel's territory and entered the Geneva's: same family of intermittent motion, different trade-off between tolerance and precision.