Extrusion problems
For a print to come out solid, the amount of plastic leaving the nozzle has to match the amount the slicer planned for — no more, no less, bead after bead for hours. When it falls short, the part comes out starved: gaps open between lines, walls go translucent, top surfaces never close. When it runs over, the part comes out bloated: surfaces turn rough and over-full, dimensions creep, the nozzle drags through its own excess. Both are extrusion problems, and reading which one you have — and whether it's steady or intermittent — points straight at the cause. Some of the fix is calibration, but the wall and top-layer choices that decide whether the plastic even had a chance are made in the model.
Too little plastic — under-extrusion
Under-extrusion shows as gaps between adjacent lines, walls you can see light through, missing sections, and tops that never fill in. The nozzle put down less plastic than the path needed. Steady under-extrusion across the whole print usually means the flow is miscalibrated or the nozzle temperature is too low for the speed — cold plastic is stiff and the extruder can't push it fast enough, so it slips. Intermittent under-extrusion — fine, then thin, then fine again — points at a partial clog or a grinding extruder: debris or heat-crept filament narrowing the flow, or the drive gear chewing the filament instead of pushing it.
Work it in order. Confirm the spool is feeding freely and the extruder isn't grinding, then check temperature — raise the nozzle if you're printing fast, because plastic can only melt so quickly and speed outruns the melt. If it's steady everywhere, calibrate the flow (extrusion multiplier) against a measured single-wall test. If it comes and goes, suspect a partial clog and clear the hot end. The design contribution is subtler: printing too fast for the temperature starves the flow, so where a part has fine features that already print slowly, don't push global speed to make up time elsewhere.
Too much plastic — over-extrusion
Over-extrusion is the opposite signature: surfaces that look rough and over-full, a blobby or ridged top, dimensions that come out oversized, and the nozzle visibly plowing through material it already laid. Here the flow is set too high, or the nozzle temperature is high enough that the plastic swells as it leaves. The fix is mostly calibration — lower the flow until a single-wall test measures the true line width, and drop the temperature if the plastic is ballooning — but over-extrusion also eats your tolerances, fattening every outer wall, so a part that fits on a well-calibrated machine can bind on an over-extruding one.
| You see | It's | First moves |
|---|---|---|
| Gaps between lines, see-through walls | Under-extrusion (steady) | Raise temp for speed, calibrate flow |
| Fine, then thin, then fine | Under-extrusion (intermittent) | Clear partial clog, check extruder grip |
| Rough, over-full, oversized | Over-extrusion | Lower flow, drop temp, re-check line width |
| Holes in the top surface | Too few top layers | Add top layers, then check flow |
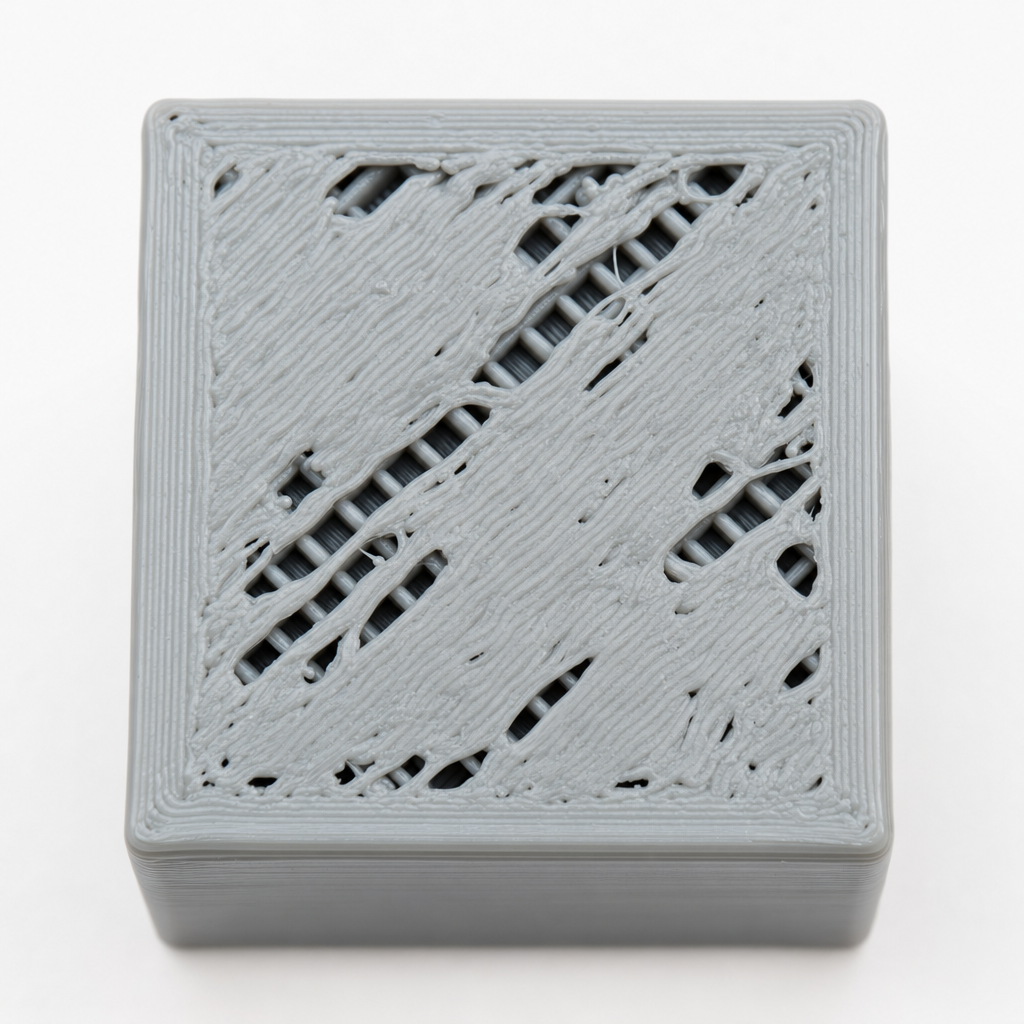
Holes in the top — a design-and-flow overlap
A top surface full of small holes or pillowing looks like under-extrusion, and often there's some of that, but the more common cause is a design number: too few top layers. The top of a part is printed over infill, which is mostly air, so the top layers have to bridge across the gaps in the infill pattern and then fill in solid above them. Too few and they never close over the voids; the surface pillows and pits. The fix is in the slicer settings you control per part — more top layers (enough solid thickness to bridge the infill, typically four to six at 0.2 mm) and, if it's borderline, denser infill so the top has less distance to span. Only once the top layers are sufficient does chasing flow make sense.
Clean plastic, honest flow, whole beads
Extrusion defects split cleanly into three owners. The machine owns clogs and a healthy extruder — keep the hot end clean and the drive gripping. Calibration owns the flow multiplier and the temperature-versus-speed balance — set them once against a measured test and most steady under- and over-extrusion vanishes. And the model owns the numbers that decide whether the plastic had a chance: enough top layers to close over infill, walls sized to whole line-widths, and features that don't force a speed the melt can't keep up with. Fix the flow at the machine, but design the part so it isn't asking the flow to do the impossible.