Print settings that matter to the design
There are hundreds of slicer settings and you do not need to understand most of them. As a designer, only a handful actually talk back to decisions you already made in the model — and those are worth knowing cold, because they're where your geometry and the print meet. Set them right and the part you imagined is the part that comes off the bed. Set them blind and you'll blame the model for problems that were really a slider in the wrong place. Here are the five that earn their keep.
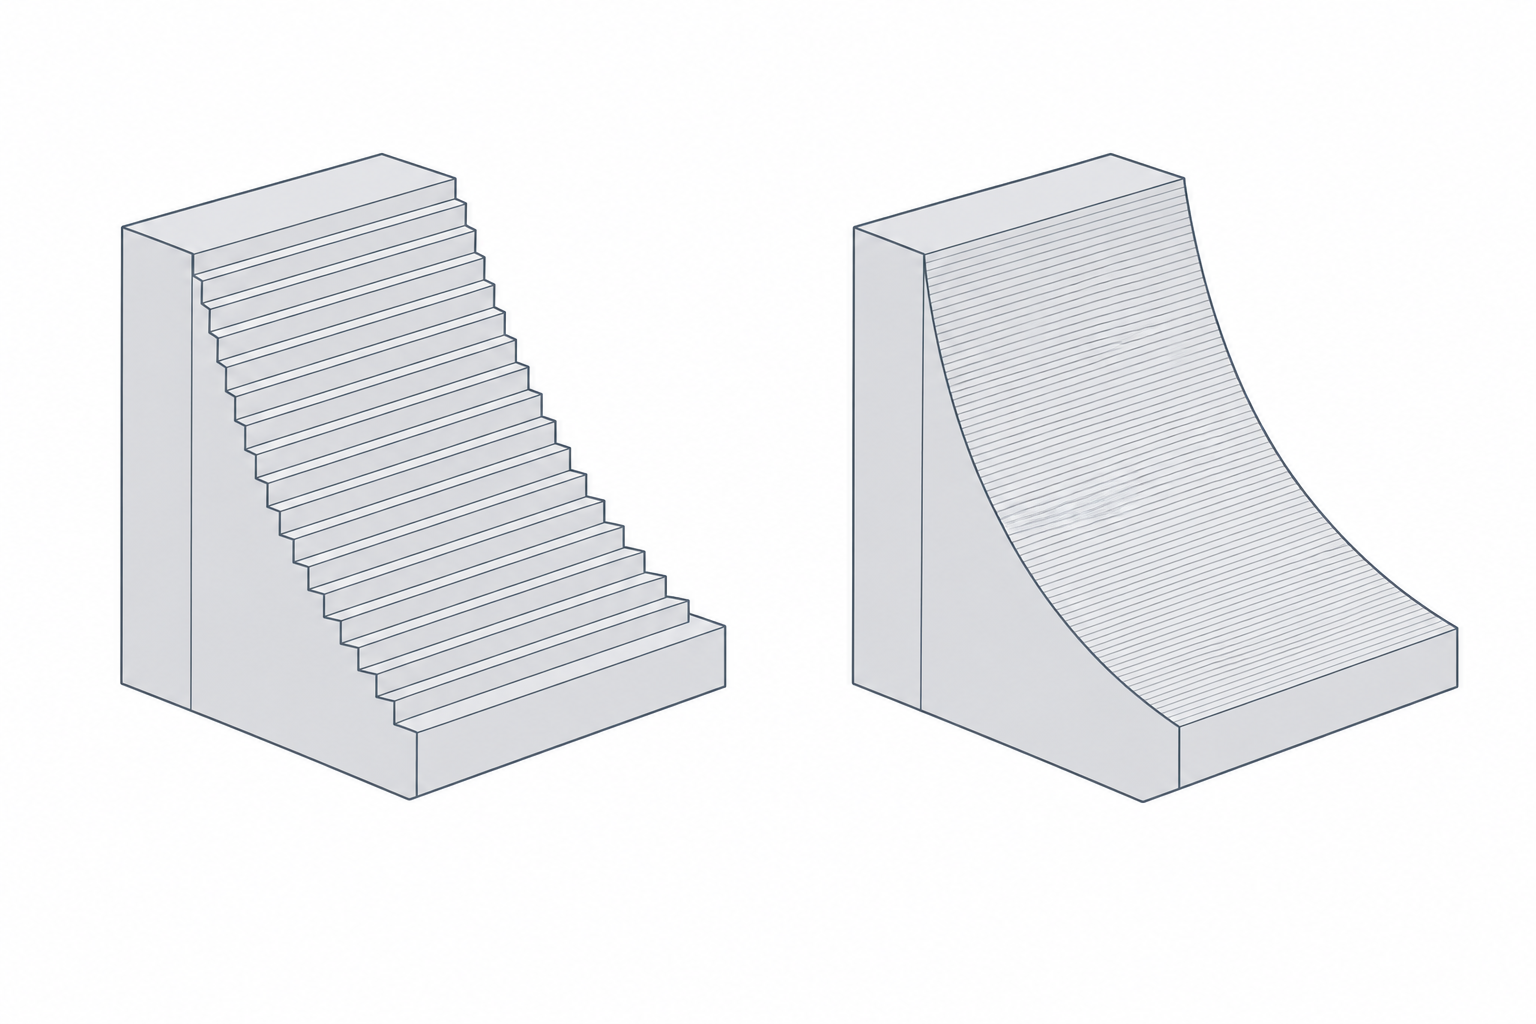
Layer height vs your features and curves
Layer height is the thickness of each slice — 0.2 mm at the baseline. It's the trade between speed and finish: thicker layers print faster and stronger in Z but show coarse stair-steps; thinner layers look smoother and resolve finer detail but take longer.
The design link is vertical resolution. A curved or sloped surface is built from stacked layer edges, so on a shallow slope thick layers leave visible stepping. If a part has a fine engraved logo or a gentle dome you want crisp, a thinner layer (0.1–0.15 mm) buys you that. If it's a chunky bracket, 0.2 or even 0.3 mm is fine and far faster. Match the layer height to the smallest vertical feature you care about, not to habit.
Wall count — the strength dial
The number of perimeters is the setting that most changes how strong a part is, and it's the first thing to reach for when a part flexes or snaps. This is owned by Walls, perimeters and infill — read it for why walls beat infill and how to size them as whole multiples of line width. The slicer takeaway: if you designed a 1.35 mm wall expecting three perimeters, make sure the wall-count setting actually gives you three.
Infill — support for the top, not raw strength
Infill is the sparse lattice inside the walls. Its real job is humble: it holds up the top layers so they don't sag, and adds some stiffness. It is not a linear strength dial — going from 20% to 40% roughly doubles time and plastic for far less than double the strength. The everyday 15–20% is right for most parts; bump it only for parts taking real impact. Again, the full argument lives in Walls, perimeters and infill — don't reach for infill when the answer is another perimeter.
Temperature — the bonding setting
Nozzle temperature controls how well each layer welds to the one below. Print too cold and the layers barely fuse, so the part splits along a layer line under load. Print hotter (within the filament's range) and the bond gets stronger — at some cost in stringing and overhang quality. This is the direct lever on the weakness explained in Layer adhesion and anisotropy: if a part keeps cracking between layers, a few degrees hotter often does more than any change to the model.
Speed — finish and adhesion
Print speed trades throughput against quality. Faster printing gives the plastic less time to bond and less time to lay down cleanly, so fast prints show rougher walls and weaker layer adhesion. Two places to slow down on purpose: the first layer, which should always crawl for adhesion (see First layer and bed adhesion), and tall thin features that wobble if the head whips around them. Everything else can run at the preset's pace.
| What you want | Setting | Note |
|---|---|---|
| Smoother curves / fine detail | Thinner layer height | 0.1–0.15 mm; slower |
| Faster print, finish doesn't matter | Thicker layer height | 0.3 mm; chunky parts |
| Stronger part | More walls (perimeters) | Before infill, every time |
| Stop layer-line cracking | Higher temperature | Within filament range |
| Hold up flat top surfaces | A little more infill | 15–20% is usually enough |
| Cleaner first layer | Slow first-layer speed | Adhesion lives here |
Five settings, each tied to a choice already baked into your geometry. Learn how they push back and the slicer stops being a black box.