Lightweighting
Every gram of plastic is print time, filament cost, and — on anything that moves — wasted mass. Lightweighting is the craft of taking material out of a part while keeping the stiffness you need. The mistake is to do it with the infill slider. The wins come from geometry: where the material sits matters far more than how much of it there is.
Walls beat infill, again
Most of a part's stiffness lives in its outer walls, not its core (see Walls, perimeters and infill). So the first lightweighting move is counter-intuitive: add a perimeter and drop the infill. A part with three walls at 10% infill is usually stiffer and lighter than the same part with two walls at 40%. You moved plastic from the dead centre, where it does little, to the shell, where it resists bending.
When you do need internal support for the top layers, pick the infill pattern deliberately:
- Gyroid — stiff in every direction (isotropic), no weak axis, prints fast. The default for parts that get loaded from odd angles.
- Cubic — also fairly isotropic, slightly stiffer per gram, good for parts taking real load.
- Grid / lines — cheap and fast but stiff in only two directions. Fine for parts that mostly need to hold their top layers up.
Shell it out
A "solid" CAD body is solid because you modelled it that way, not because it needs to be. Coring — hollowing the interior to leave a uniform shell — strips out the dead mass in the middle while the load-bearing skin stays put. A solid 30 mm boss cored to a 2 mm wall loses most of its weight and almost none of its stiffness, because the outer fibres do the work in bending.
Two cautions when you core:
- Leave the shell a whole number of line widths thick so it prints as clean perimeters.
- A fully enclosed hollow traps uncured air and may need a small drain / vent hole so the slicer doesn't fill it and so resin or trapped support can escape on other processes.
A rib beats a kilo of infill
The single most useful number in lightweighting: bending stiffness scales with the cube of section depth. Double how tall a section is and it gets eight times stiffer. That is why a thin rib standing on edge crushes infill on a stiffness-per-gram basis — the rib puts material far from the bending axis, where the cube law rewards it, while infill smears it uselessly near the centre.
So when a lightweighted part still flexes, do not pour the infill back in. Add a rib or two. A 0.9 mm rib, 8 mm tall, often does more than raising infill from 10% to 50% across the whole part — for a fraction of the plastic and the time.
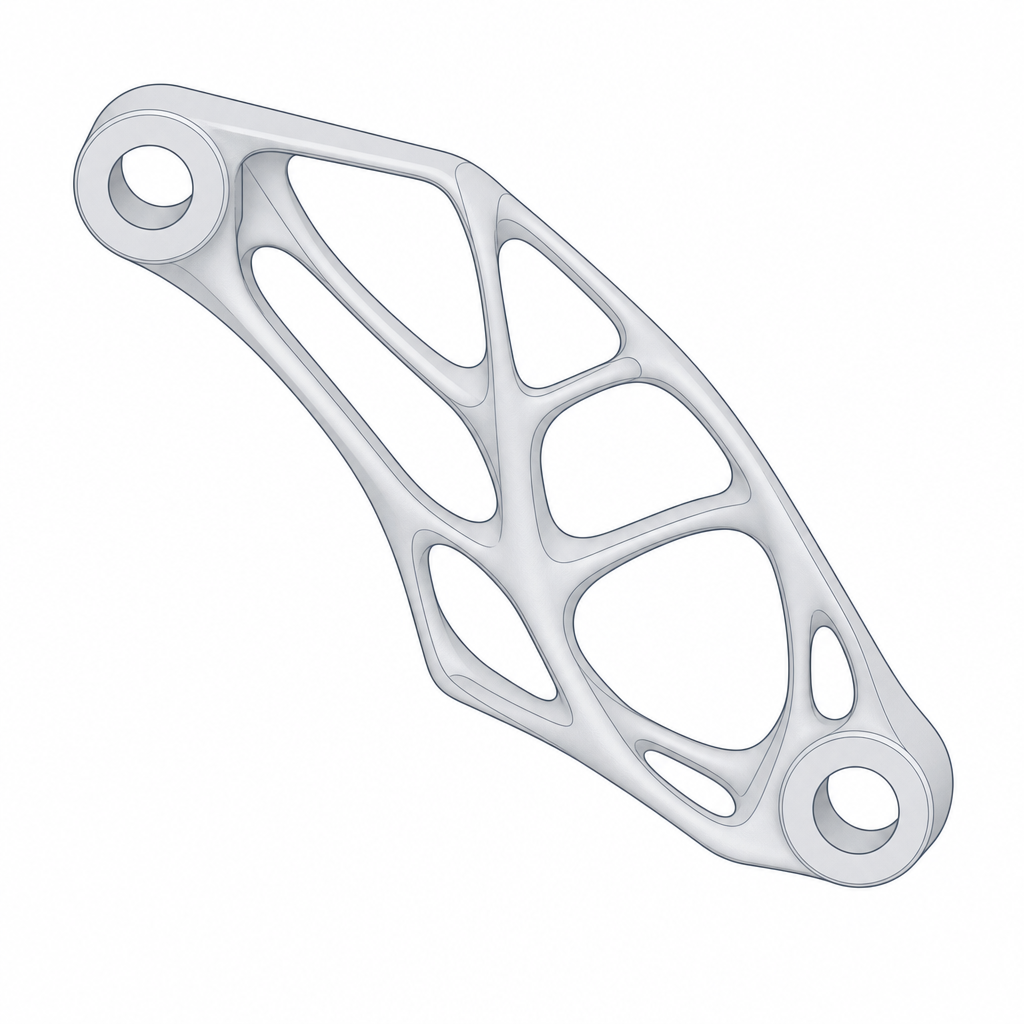
Put material only where the stress is
The endgame of lightweighting is to leave plastic exactly where the load flows and nowhere else — the organic, branching look you see on optimised brackets. You cannot eyeball that reliably. Run the part through A quick stress check with FEA, see which regions are barely stressed, and carve those away; thicken the bright, highly-stressed paths.
Work the loop: lighten, simulate, lighten again. Start conservative, take out material where the analysis says you can, and stop when the stress map fills in evenly. A part designed this way is lighter, cheaper, and faster to print than one you guessed at — and it is just as strong where it counts.